20 Dreamy Whimsical Kids Room Ideas on a Budget That Look Expensive
The Ultimate Guide to Magical, Affordable Children’s Room Transformations — With Full Budgets, DIY Instructions.
You Do Not Need a Big Budget to Create a Magical Kids Room
One of the most persistent myths in children’s interior design is that magical, whimsical, Pinterest-worthy kids rooms require significant financial investment. Scroll through the most-saved children’s bedroom pins on Pinterest and you will see rooms that seem to whisper of professional interior designers, expensive bespoke furniture, and decorating budgets that most families simply do not have available. The fairy light canopy glowing above a beautifully dressed bed. The cloud ceiling floating over a cosy reading nook. The enchanted forest mural that covers the full feature wall. The curiosity corner with its woodland mushroom details and tiny fairy doors.
What those images almost never tell you is that the vast majority of them were created by parents working with tight budgets, basic DIY skills, and a clear creative vision. The fairy light canopy cost fifteen dollars and twenty minutes to install. The cloud ceiling is made from polyester toy stuffing and white paint. The mushroom mural was painted by a first-time parent using craft shop acrylics and a YouTube tutorial. The fairy doors were three dollars each from Etsy.
This is the article that tells you what those pins leave out. All twenty of the whimsical kids room ideas that follow are achievable with minimal budget, minimal tools, and minimal prior DIY or craft experience. Each idea comes with a realistic budget estimate, clear implementation guidance, a professional styling tip.
The complete whimsical room transformation — ceiling, walls, bed, shelving, accessories —using the ideas in this guide is achievable for between eighty and one hundred and twenty dollars. The room that results will look, to every visitor, like the result of a very different kind of investment. That is the whole point.
Let the magic begin — and let it cost almost nothing.
Why Whimsical Kids Rooms Are Biggest Trend Right Now
The data behind the whimsical kids room trend is remarkable. According to Pinterest’s most recent trend data and the 2026 Parenting Report:
- Whimsical design has been named the #1 interior design trend for 2026 by a survey of 100 professional designers
- Eclectic maximalism searches on Pinterest are up 215% — and whimsical kids rooms sit at the intersection of this trend and children’s design
- Enchanted forest and fairy room content consistently generates among the highest save and engagement rates of any children’s room category on Pinterest
- Mushroom-themed bedroom searches are surging — driven by the cottagecore aesthetic that Pinterest data identifies as a defining movement of 2025–2026
- Vintage kids bedroom searches are up 100% year-on-year, and the vintage and whimsical aesthetics frequently overlap in the most popular children’s room pins
- Budget transformation content — specifically budget kids room transformations — is among the most-searched and most-saved content categories on the platform, because it makes the aspiration accessible to the majority
The convergence of these trends — whimsical design at its cultural peak, budget transformation content at its highest engagement, and an unprecedented parental desire to create meaningful, imaginative spaces for children — makes right now the single best moment to create and publish content in this space. The audience is enormous, the aspiration is near-universal, and the budget reality that most families face makes practical, affordable guidance genuinely valuable rather than merely inspirational.
5 Golden Principles of Budget Whimsical Room Design
1. The ceiling and the canopy do the heaviest lifting
In a whimsical children’s room, no surfaces deliver more impact per dollar than the ceiling (clouds, stars, hanging installations) and the bed canopy (fairy lights, draped fabric). Both are inexpensive to create, both photograph magnificently, and both are the first things a child sees when they wake up and the last things they see before they sleep. Invest your creative energy and the largest share of your budget here.
2. One feature wall is worth more than four plain walls
A single wall of whimsical wallpaper, a hand-painted mural, or a carefully assembled gallery of framed illustrations transforms the entire atmosphere of a room more powerfully than any amount of furniture or accessory spending. Focus your wall decoration efforts on a single feature wall and execute it with care and commitment.
3. Colour palette consistency is free and non-negotiable
Choose three colours before buying anything — a primary tone, a secondary tone, and an accent. Apply these consistently across every element of the room, from the wallpaper to the rug to the cushion covers to the fairy door paint. Colour consistency is what makes individually sourced, budget items read as a coherent, professionally designed whole.
4. Fairy lights solve almost every atmospheric problem
Warm white fairy lights — the single most effective mood-transforming tool available at budget price points — make temporary clouds magical, give reading nooks a cosy glow, illuminate canopies, thread through botanical corners, and generally elevate every whimsical room feature they touch. Buy several strings. Use them everywhere.
5. Involve the child
Children’s rooms that children have contributed to creating — that contain objects they have chosen, painted, collected, or made — have an emotional resonance and personal meaning that no amount of professional interior design can replicate. Involve your child in every stage of the transformation and the result will be a room that is not merely beautiful but genuinely theirs.
Budget Overview: How to Allocate $100 for Maximum Whimsical Impact
If you are working with a total budget of approximately $100 for a complete whimsical room transformation, here is the allocation that delivers the greatest visual impact across all room surfaces:
- Ceiling feature (cloud DIY or paper star garlands): $10–15
- Feature wall (peel-and-stick wallpaper, one wall): $30–40
- Bed canopy (hula hoop + fabric + fairy lights): $20–25
- Cloud shelves (DIY plywood) or tree branch shelf: $10–15
- Floor rug (discount store or online): $15–20
- Accessories (fairy doors, star stickers, botanical corner, gallery wall): $10–20
- Fairy lights (two to three additional strings): $8–12
Total: $103–$147. Achievable comfortably within a $120 budget by sourcing the rug, accessories, and fairy lights from discount stores and online marketplaces, and making the ceiling feature and shelving yourself.
The 20 Budget Whimsical Kids Room Ideas
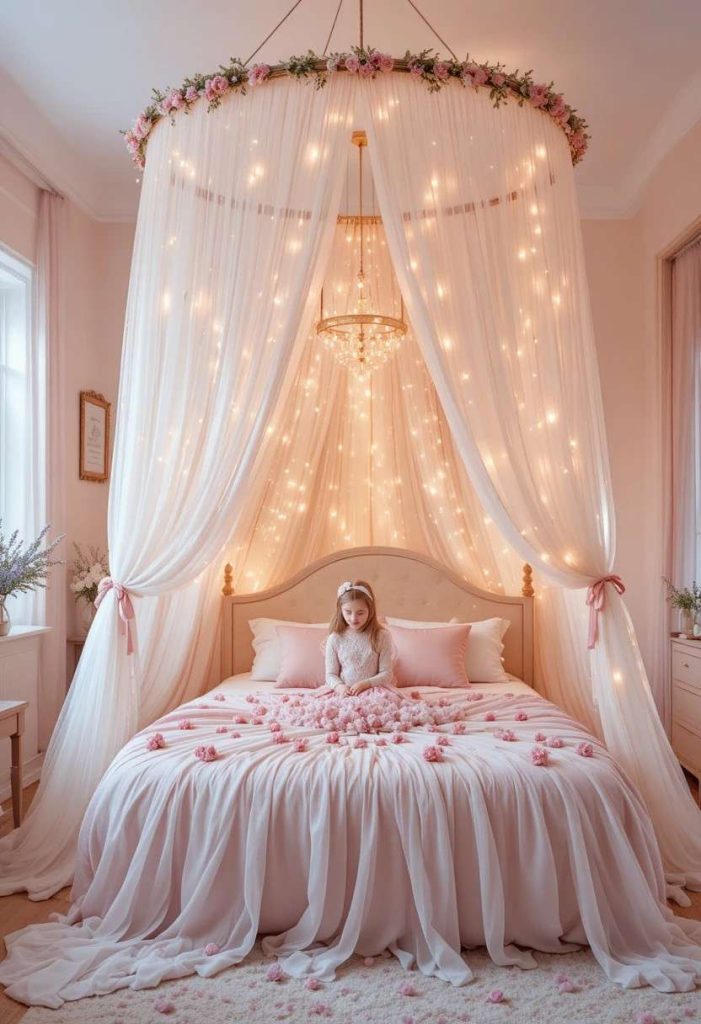
1. DIY Fairy Light Canopy Over the Bed: $20 of Magic That Looks Like a Designer Dream
Budget: Estimated cost: $15–$30
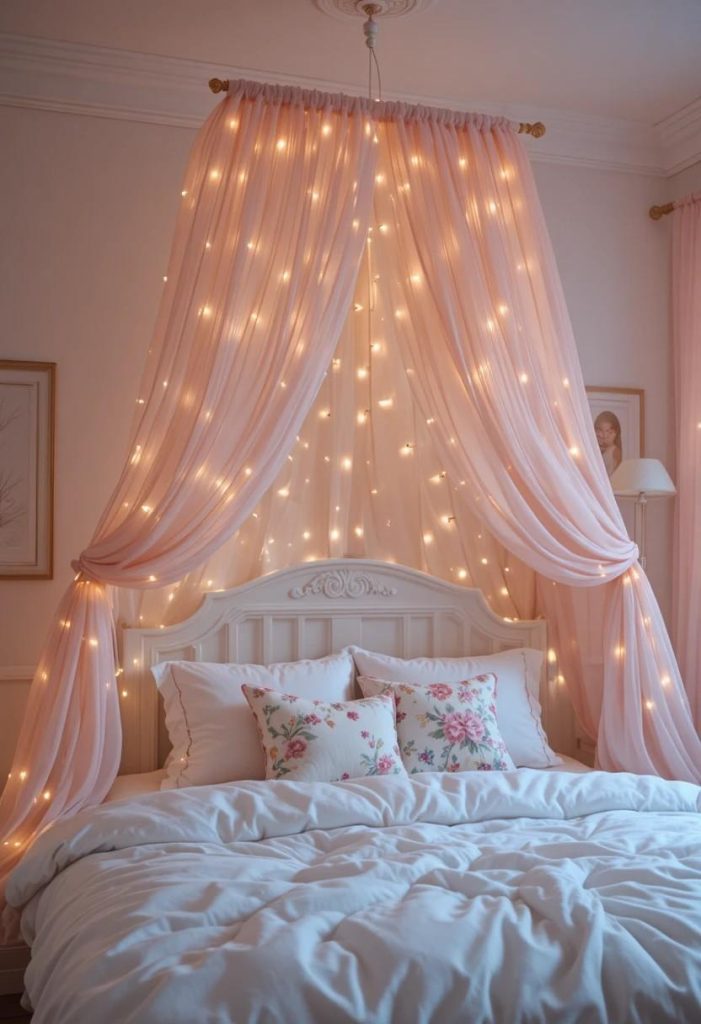
Of all the whimsical bedroom transformations available to a parent working within a tight budget, the fairy light canopy over the bed delivers the single greatest impact per dollar spent. The concept is breathtakingly simple: a length of sheer fabric — organza, tulle, or voile in white, blush, or soft gold — is gathered at a single ceiling hook above the bed’s headboard and allowed to fall in soft, billowing curves on either side, while a string of warm white fairy lights is woven through the fabric folds. The result is a sleeping space that looks like something from a five-star resort children’s suite, achieved for the price of two cups of coffee.
The materials required are minimal and widely available. A single ceiling hook rated for light loads is all the hardware needed. The fabric can be as simple as a two-metre length of inexpensive tulle from a fabric shop, a sheer curtain panel from a discount home store, or even a length of mosquito net from a camping supplier. The fairy lights should be warm white rather than cool or coloured — warm white has a quality that reads as genuinely luxurious and flattering, while cool white can feel clinical and coloured lights can feel garish in a bedroom context. Battery-operated fairy lights with a remote control are ideal as they eliminate the need for a nearby electrical socket.
The installation takes under fifteen minutes and requires no tools beyond a single cup hook screwed into the ceiling. Gather the fabric at the top, tie loosely with a ribbon or elastic band, loop over the hook, and allow the panels to fall naturally on either side. Weave the fairy light string through the gathered top and let it trail down through the fabric folds. For the most professional finish, use a small amount of removable adhesive to secure any fabric tails that billow too far from the bed. The final result — warm light glowing softly through draped, flowing fabric — is one of the most photographed and most-saved whimsical bedroom images on Pinterest for very good reason.
Style tip: Add a handful of dried flowers — lavender stems, small dried roses, pampas grass — tucked into the gathered fabric at the ceiling hook for a botanical detail that elevates the canopy from pretty to extraordinary.
2. Peel-and-Stick Whimsical Wallpaper: One Wall, Maximum Magic, Minimum Commitment
Budget: Estimated cost: $30–$80 for one feature wall
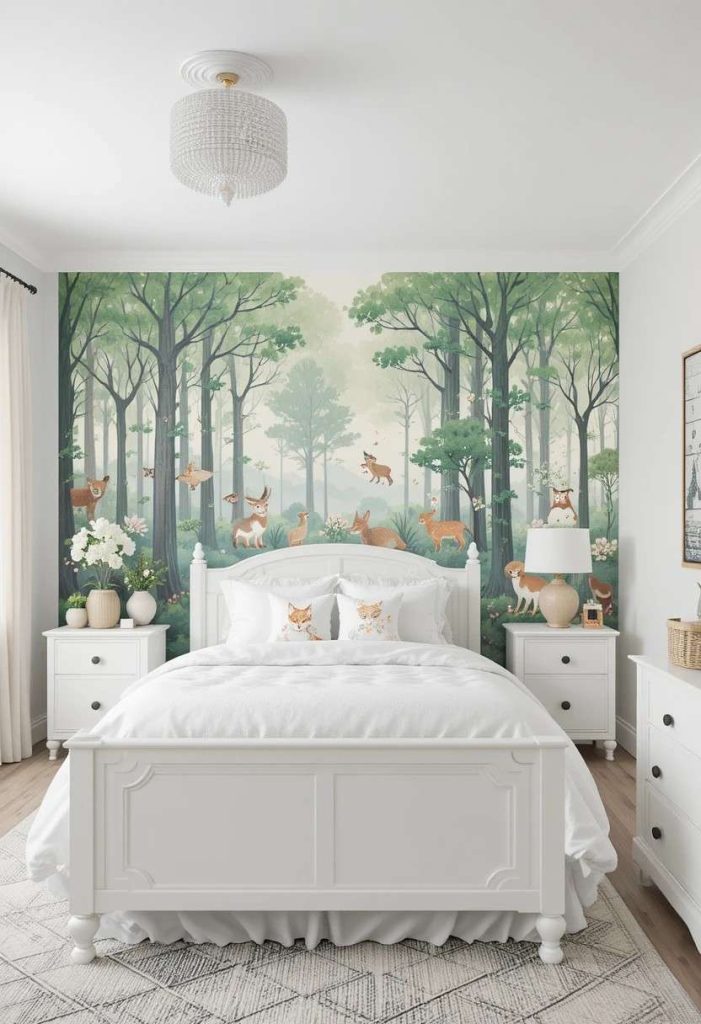
The transformation that a single feature wall of whimsical wallpaper delivers to a child’s bedroom is genuinely astonishing — and the advent of high-quality peel-and-stick wallpaper has made this transformation accessible to renters, hesitant decorators, and parents who know their child’s tastes will evolve within two years. Peel-and-stick wallpaper has improved enormously in print quality, adhesion, and removability over the past few years, and the best contemporary versions are virtually indistinguishable from traditional paste wallpaper in their visual impact while offering the enormous practical advantage of being entirely removable without wall damage.
For a whimsical kids room, the most popular and most pinned peel-and-stick wallpaper categories include enchanted forest scenes with illustrated trees and woodland animals; watercolour cloud and rainbow patterns in soft pastels; fairy tale castle and storybook illustration prints; large-scale botanical and jungle prints with oversized leaves and flowers; and celestial patterns featuring moons, stars, and planets in soft navy or lavender. Any of these applied to the wall behind the bed — the most visually prominent wall in the room, and the first one you see when you enter — establishes the entire whimsical narrative of the space instantly.
The key to making peel-and-stick wallpaper look genuinely expensive rather than obviously budget is pattern matching and surface preparation. Follow the manufacturer’s instructions precisely, particularly regarding surface cleaning and temperature during application. Take the time to match the pattern at the seams — even small misalignments are noticeable and undermine the finished quality significantly. Apply the paper to a single feature wall only, and let the rest of the room’s decoration respond to the colours and motifs of the wallpaper, pulling one or two key colours into the bedding, curtains, and accessories.
Style tip: Apply peel-and-stick wallpaper not just on walls but inside built-in wardrobe doors, on the back of a bookshelf, or inside a window seat nook — unexpected pops of whimsical pattern in contained spaces feel genuinely luxurious and considered.
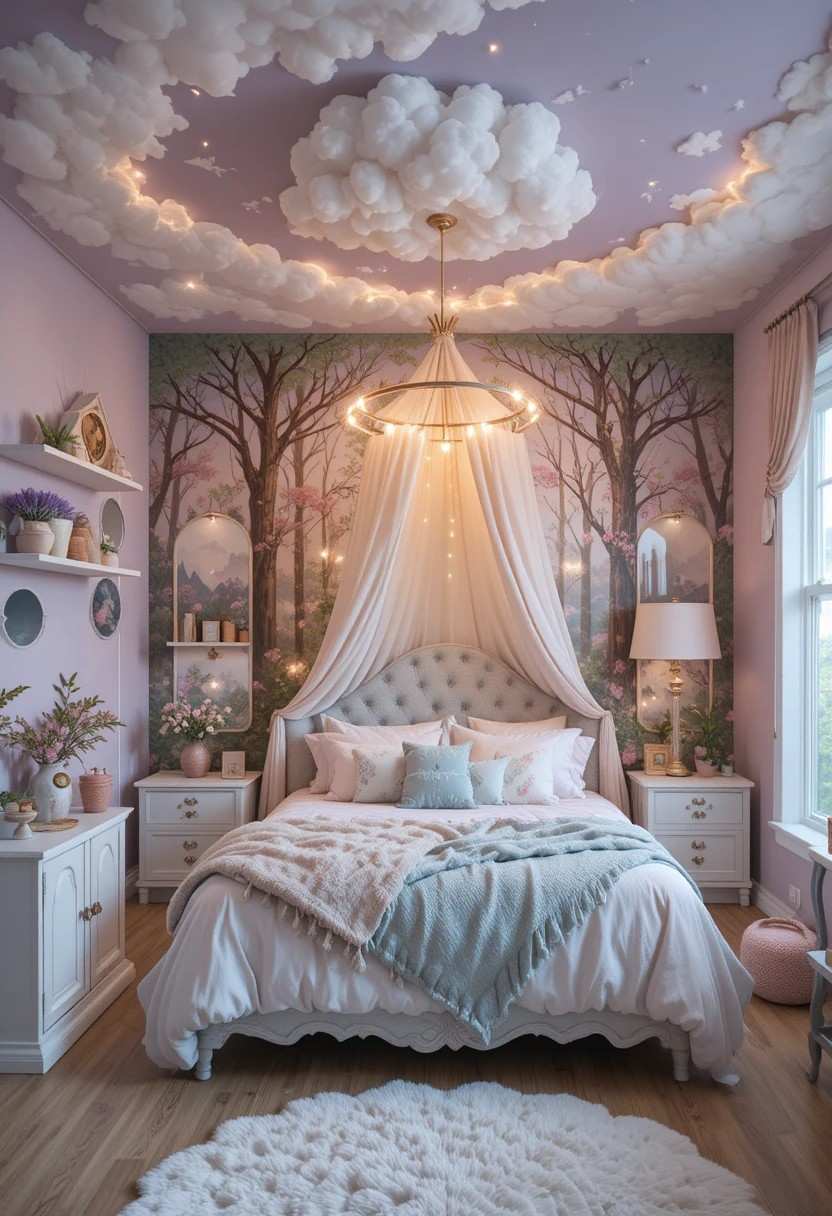
3. Cloud Ceiling With Cotton Wool and White Paint: A $10 Transformation That Stops People in Their Tracks
Budget: Estimated cost: $8–$20
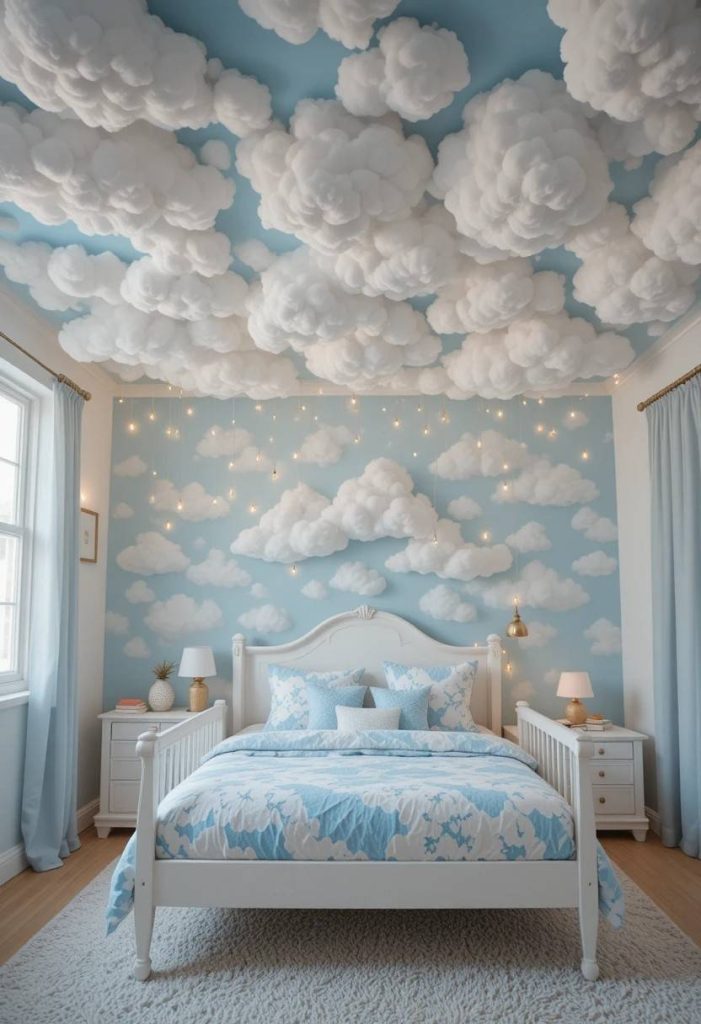
The cloud ceiling is one of the most dramatic, most child-delighting, and most budget-friendly whimsical room transformations available — and the fact that it can be achieved for the cost of a bag of polyester toy stuffing and a tin of white ceiling paint makes it one of the best-kept secrets in children’s interior design. The technique involves attaching small clumps of pulled-apart polyester fiberfill — the same material used to stuff soft toys and cushions — directly to the ceiling with white craft glue or a low-adhesion spray mount, then painting over both the ceiling and the fiberfill with white ceiling paint. The result is a three-dimensional cloud texture on the ceiling that casts beautiful, ever-shifting shadows throughout the day and looks genuinely remarkable.
The process is straightforward but requires patience and a good eye for cloud-like shapes. Pull the polyester fiberfill into irregular, cloud-shaped clumps — avoid perfectly round balls, which look artificial, and aim instead for the organic, irregular shapes of real cumulus clouds. Apply craft glue to the back of each clump and press firmly to the ceiling in natural cloud groupings. Allow to dry fully before applying white ceiling paint with a roller, pushing paint into the fiberfill to bind it and give it a consistent finish. Two coats of white ceiling paint will create the cleanest, most professional result. The fiberfill can be as sparse or as abundant as you prefer — a few scattered cloud formations over the bed, or a full ceiling covering for a complete sky effect.
To elevate the cloud ceiling from charming to truly magical at minimal additional cost, add a string or two of warm white fairy lights woven between the cloud formations — the lights catch the texture of the fiberfill and create a softly glowing, luminous quality that is extraordinarily beautiful at night. Alternatively, apply a scattering of adhesive glow-in-the-dark stars between the cloud formations so that at bedtime, when the lights go out, the ceiling transforms from clouds to a star-filled night sky — a detail that children find completely enchanting.
Style tip: Paint the ceiling sky blue before attaching the polyester cloud formations — the contrast between the blue background and the white three-dimensional clouds creates a far more convincing and dramatic sky effect than white clouds on a white ceiling.
4. Thrifted and Upcycled Furniture With Chalk Paint: Making Old Pieces Look Enchanted
Budget: Estimated cost: $20–$60 including furniture and paint
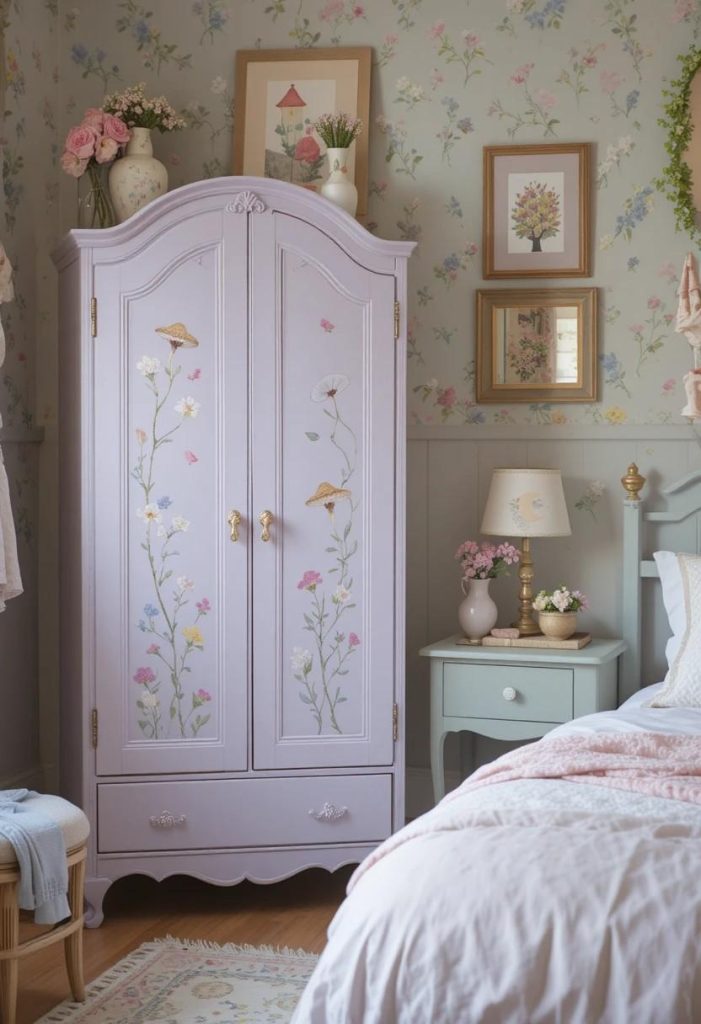
Some of the most beautiful furniture in the finest whimsical children’s rooms costs almost nothing — because it was found at a charity shop, a car boot sale, or on a Facebook Marketplace listing for the price of a takeaway coffee, and then transformed with a tin of chalk paint, a stencil, and a couple of hours of creative effort. The upcycled furniture approach is not merely a budget strategy; it is a design philosophy that produces results that are genuinely impossible to achieve by purchasing new. A worn wooden bedside table painted in soft lavender with a hand-painted moon and stars motif on the drawer front is not just a piece of budget furniture — it is a unique, one-of-a-kind object that exists nowhere else in the world and that tells a story of creativity and care.
Chalk paint is the transformational tool that makes this approach accessible to anyone regardless of their painting experience. It adheres to almost any surface without sanding or priming, covers previous paint or varnish in one or two coats, dries to a beautifully soft matte finish that is inherently period and artisanal in quality, and can be distressed with fine-grit sandpaper at the edges to create a charming, well-loved appearance. For a whimsical children’s room, the most effective chalk paint colours are soft pastel tones — dusty lilac, sage green, soft sky blue, chalky pink, and warm cream — all of which have an immediate fairytale quality that plastic-finished new furniture can never replicate.
Beyond simple colour transformation, stencilling adds a layer of whimsical narrative to upcycled furniture that elevates it to something genuinely extraordinary. Stencil mushrooms and flowers around the edges of a wardrobe panel. Paint a crescent moon on a bedside table drawer. Add small stars scattered across the top of a chest of drawers. Outline a tree with branches on the side of a bookcase. These small decorative gestures cost almost nothing in materials but transform ordinary painted furniture into objects with genuine personality and charm that children form real emotional attachments to.
Style tip: Seal chalk paint furniture with clear wax rather than varnish for the best finish in a child’s room — wax maintains the soft, chalky aesthetic of the paint while providing adequate protection, and can be easily refreshed if the surface becomes worn.
5. DIY Tree Branch Bookshelf: A $0–$15 Natural Wonder That Every Child Adores
Budget: Estimated cost: $0–$15
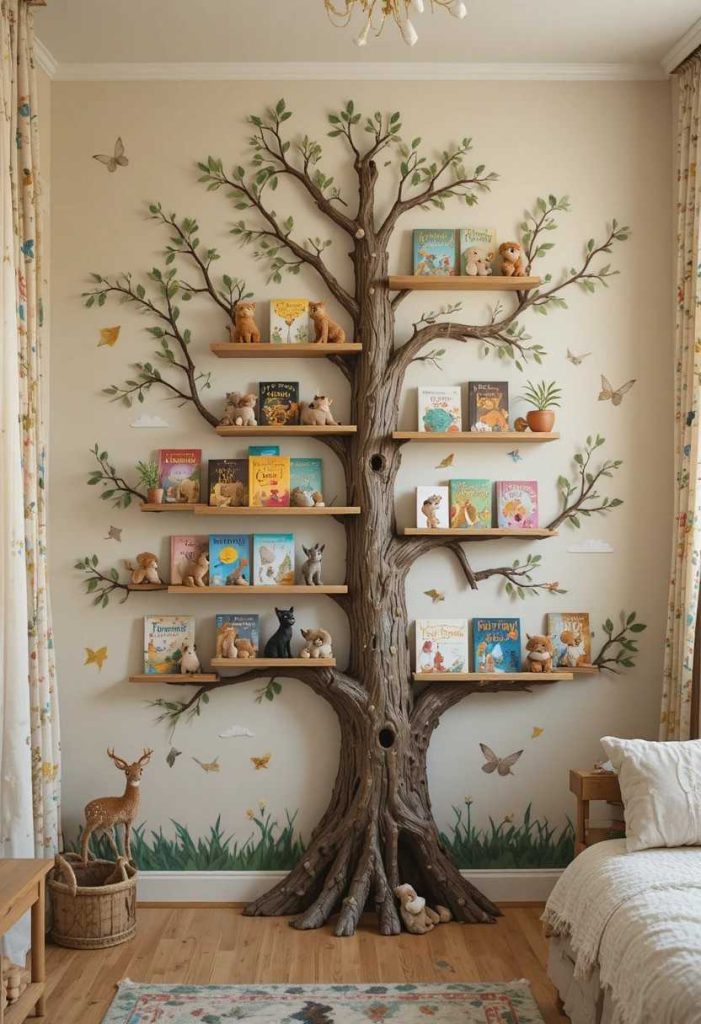
One of the most beloved features of the enchanted-forest-inspired whimsical kids room is the tree branch bookshelf — a real or faux branch mounted horizontally on the wall, with small ledge shelves attached at intervals along its length to hold books, small toys, and decorative objects. The effect is of a tree growing from the wall, its branches offering resting places for a child’s most treasured possessions. It looks like something from a bespoke interior design project and costs almost nothing to create.
The most authentic version uses a real foraged branch — fallen timber found in a woodland, a park, or a garden. Look for a branch that is structurally sound, reasonably straight over its main length but with interesting natural curves and subsidiary branches, and large enough to span a significant portion of the wall — one to two metres is ideal. Allow the branch to dry for several weeks if freshly cut, then sand lightly to remove any loose bark or sharp protrusions, and seal with clear matt varnish to stabilise it. Mount using two or three L-bracket shelf supports positioned at points where the branch’s natural shape allows them to sit invisibly, and secure to wall studs for safety.
Small flat ledge shelves — simple lengths of timber cut to fifteen or twenty centimetres — can be attached to the undersides of subsidiary branches or mounted to the wall just behind the main branch, creating practical display and storage surfaces that appear to be growing from the branch itself. Paint or stain the ledges to match the natural branch colour for a seamless, organic look. Around the base of the branch on the wall, paint or stencil climbing leaves, vines, small woodland animals peering from behind the branches, or simply allow the branch to speak for itself against a plain or lightly textured wall.
Style tip: Hang small felted woodland animals — a fox, a rabbit, an owl — from the branches of your tree bookshelf using invisible thread, as if they are inhabiting the tree. These can be inexpensively made from craft felt or purchased from Etsy sellers for just a few dollars each.
6. Balloon Cloud Installation Above the Bed: A Birthday Party Trick That Lasts All Year
Budget: Estimated cost: $10–$25
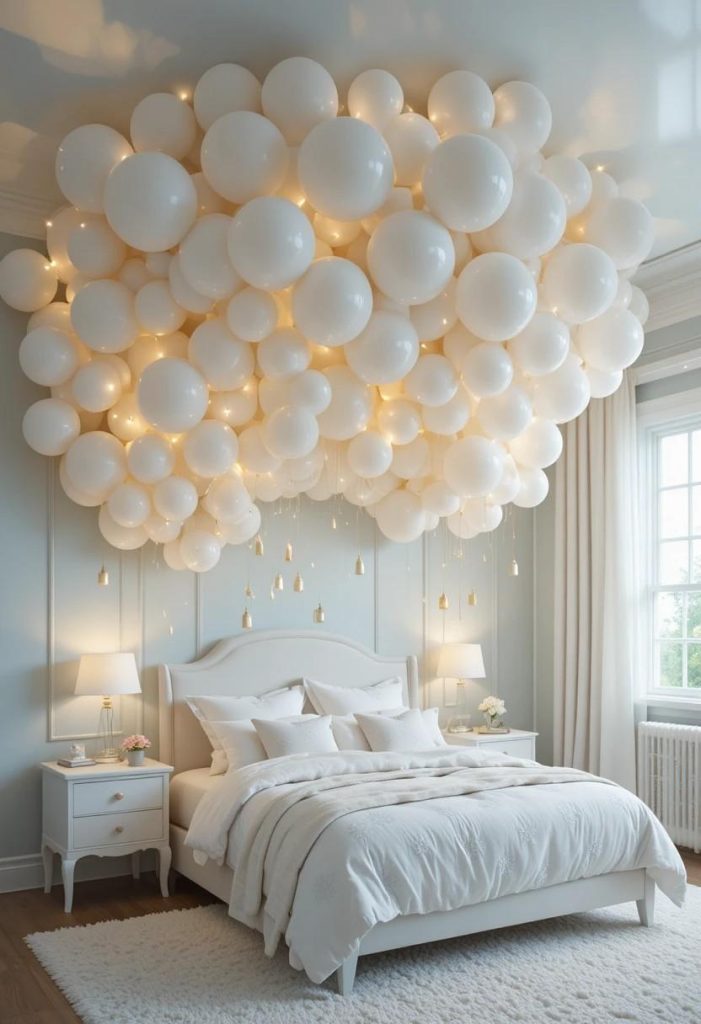
White balloons cluster together above a child’s bed like a permanent cloud of cotton-white wonder — this is the balloon cloud ceiling installation, a deceptively simple decorating technique that looks like something from a high-end hotel children’s suite and costs approximately the same as a bag of white balloons and a roll of double-sided tape. The technique involves inflating white balloons to varying sizes (a crucial detail — identical sizes look artificial while varied sizes create a natural, cloud-like irregularity), attaching them to the ceiling above the bed using removable adhesive hooks and a netting or string system, and building them into a full cloud formation.
The most effective balloon cloud installations use balloons in at least three different sizes — large (30cm), medium (20cm), and small (15cm) — clustered in organic groupings that mimic the irregular structure of real clouds. Attach a length of invisible thread or white fishing line between two ceiling hooks above the bed, then tie individual balloons at varying heights along the thread, building a layered, three-dimensional cluster that has depth and volume. Adding pearlescent or metallic white balloons among the standard white ones adds a subtle shimmer that catches light beautifully and elevates the installation from simple to sophisticated.
To maintain the cloud installation without continuously replacing balloons as they deflate, consider using small round paper lanterns in white (widely available and very inexpensive) as the primary cloud structure, with a small number of actual balloons for any party or special occasion. Paper lanterns keep their shape indefinitely and can be stored flat and reinstalled easily. String warm fairy lights through the lantern cloud for an evening transformation that makes the cloud glow softly from within — a detail that photographs beautifully and that children find absolutely magical at bedtime.
Style tip: For a permanent cloud installation that requires no maintenance, use white papier-mâché balls from a craft shop in varying sizes instead of balloons — they can be painted and will last indefinitely.
7. Glow-in-the-Dark Star Ceiling: A $5 Transformation With Infinite Bedtime Magic
Budget: Estimated cost: $5–$15
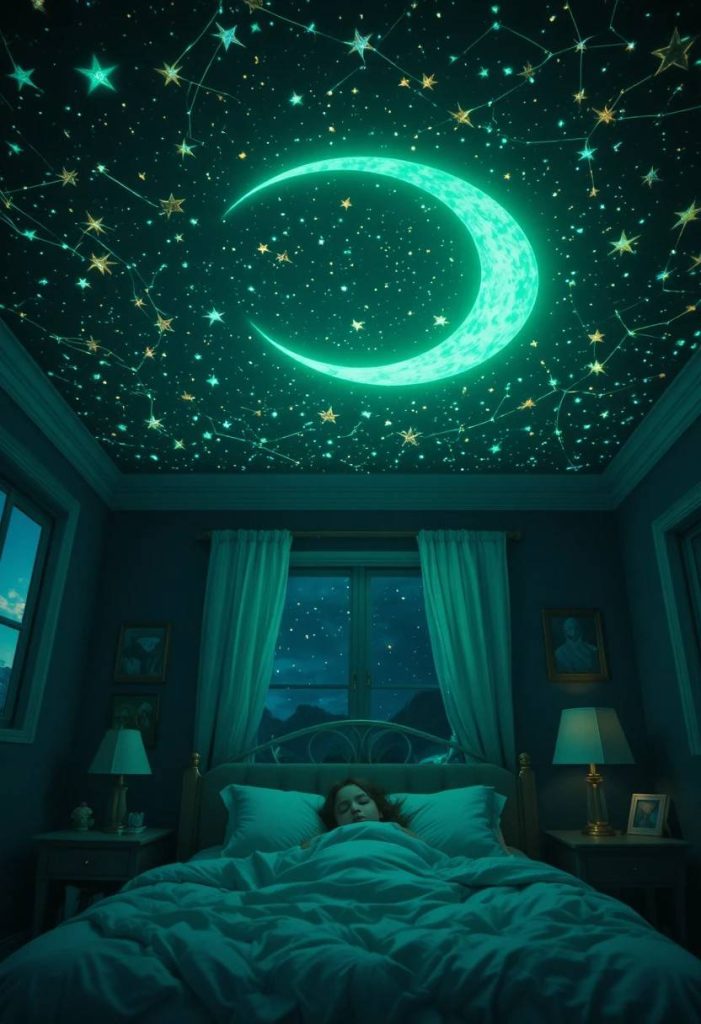
The glow-in-the-dark star ceiling is perhaps the single most universally beloved whimsical bedroom feature among children of all ages — from toddlers experiencing it for the first time with wide, disbelieving eyes to pre-teens who maintain a genuine affection for the nightly ritual of watching the ceiling come alive as the lights go out. It costs almost nothing to create, requires no tools, can be removed without damage, and delivers an experience that no amount of money can make more magical: the genuine sensation of sleeping under the stars.
The quality of glow-in-the-dark star stickers varies enormously — the best are those with high phosphorescent content that glow brightly for several hours after a brief exposure to light. Look for stickers with a customer-verified long glow time (three to five hours) rather than the cheapest available, which may fade within thirty minutes. For the most realistic effect, spend time arranging the stars in actual constellation patterns — Orion, the Big Dipper, Cassiopeia — rather than scattering them randomly. Print a star chart from a free online astronomy resource and use it as a reference while placing the stickers. This approach transforms the star ceiling from a decorative gesture into an educational one, and many children develop a genuine interest in astronomy as a result.
To significantly elevate the glow-in-the-dark ceiling at minimal additional cost, combine the star stickers with a hand-painted or stencilled moon — a large, soft crescent moon in pale gold or silver painted directly onto the ceiling above the bed becomes the focal point around which the stars are arranged. For the most magical effect of all, use photoluminescent paint (available from craft shops for around ten to fifteen dollars a tin) to paint the moon and several cloud formations directly onto the ceiling — these glow with a significantly more beautiful and intense quality than stickers, creating a ceiling that genuinely looks lit from within rather than simply stuck on.
Style tip: ‘Charge’ the glow-in-the-dark ceiling stars by holding a torch directly against each star for fifteen to thirty seconds before bedtime — the charge creates a significantly brighter and longer-lasting glow than room lighting alone provides.
8. DIY Rainbow Wall: The Boldest, Most Joyful $15 Room Transformation Possible
Budget: Estimated cost: $10–$25
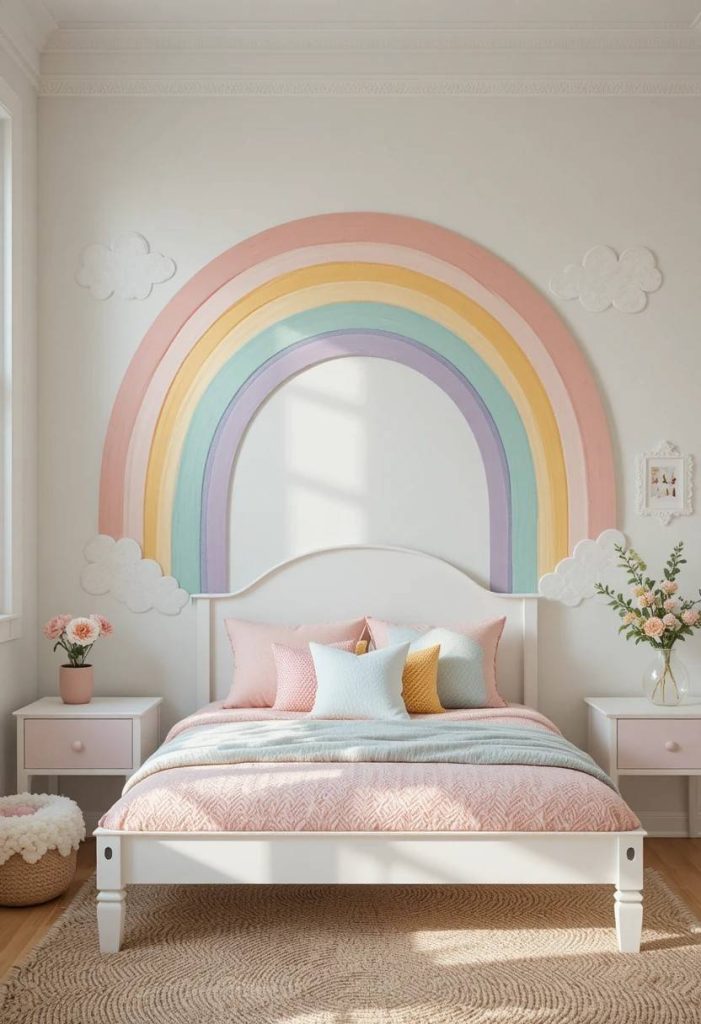
A hand-painted rainbow wall is the whimsical children’s room feature that stops scroll on Pinterest more reliably than almost any other single element — and the fact that it costs under twenty dollars in materials and requires no artistic training to execute successfully makes it one of the most democratically available design statements in children’s interior design. The rainbow wall, whether painted as an arching design above a bed, as a series of bold horizontal stripes across an entire wall, or as a sunset-gradient washed across a corner, brings a quality of pure, unabashed joyfulness to a child’s room that quieter decorating choices simply cannot match.
The simplest and most effective rainbow wall approach for a non-artist is the arching rainbow over the bed — a single, bold arch painted in the classic red-orange-yellow-green-blue-indigo-violet sequence above the headboard, using painter’s tape to create clean, precise curved lines between each colour band. Measure the arch carefully with a length of string pinned at the centre of the arch’s midpoint, use this to draw the curved lines lightly in pencil, apply painter’s tape along the pencil lines, and paint each colour band in sequence. Remove the tape while the paint is still slightly wet for the sharpest, cleanest edges. The result — a bold, joyful arch of colour above the bed — is one of the most immediately impactful decorating gestures available.
For a more subtle and sophisticated interpretation of the rainbow wall that reads as genuinely design-forward rather than nursery-basic, use muted, pastel versions of the rainbow colours rather than full-saturation primaries. A soft blush, peach, butter yellow, mint, sky blue, and lavender gradient across the wall reads as beautifully whimsical rather than loudly playful, appeals to children from toddler through early teen years, and coordinates with a far wider range of furniture and accessory colours. This pastel rainbow approach is consistently one of the most-saved and most-recreated whimsical kids room ideas on Pinterest.
Style tip: Add small hand-painted clouds at either end of the rainbow arch — two or three simple rounded white forms painted with a round brush — to complete the sky narrative and give the rainbow its natural context.
9. Whimsical Reading Nook From a $30 Ikea Billy Bookcase: Impossible Value
Budget: Estimated cost: $30–$60 including bookcase
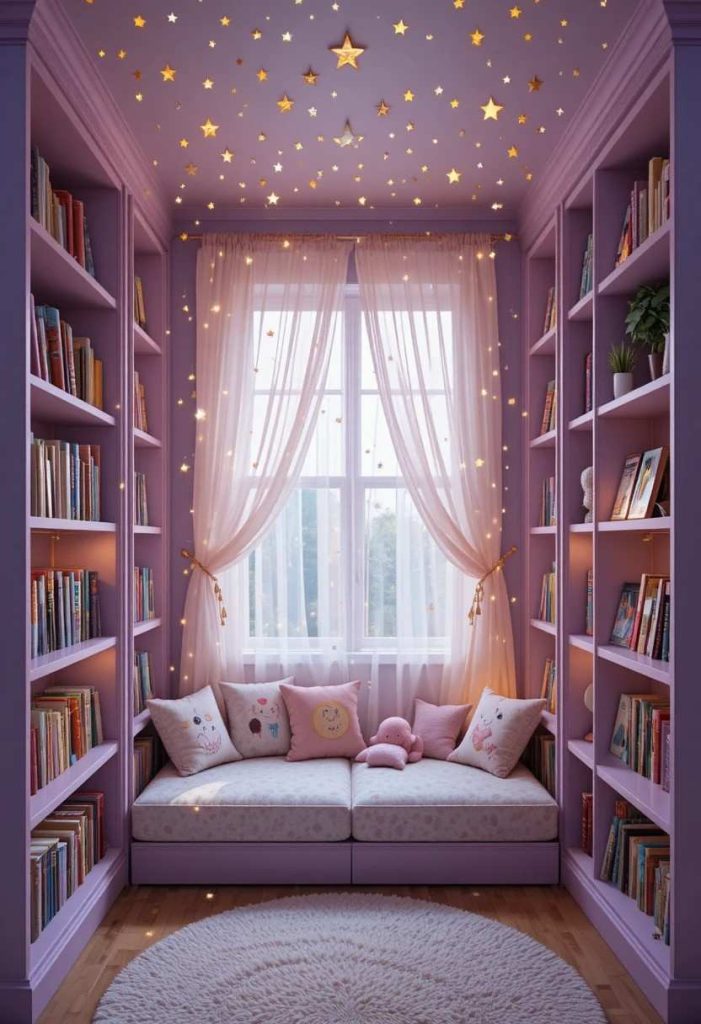
The Billy bookcase from IKEA is arguably the most versatile piece of flat-pack furniture ever manufactured — and one of its less-celebrated applications is as the structural foundation of a magical, enclosed reading nook that gives a child their own private, book-lined world within their bedroom for the cost of a single bookcase and an afternoon of creative effort. The concept is simple: two Billy bookcases are placed facing each other approximately sixty centimetres apart, a length of plywood or MDF is used to create a seat or floor platform between them at the base, and the remaining structure is dressed with a curtain rod across the top, a fabric curtain that can be drawn closed for privacy, cushions on the floor, and fairy lights along the inner shelves.
The reading nook transformation of a standard bookcase begins with painting — chalk paint in a whimsical colour (soft lavender, sage green, or starry deep blue) applied directly to the bookcase creates an immediate transformation from flat-pack IKEA to something that looks genuinely bespoke. The interior back panel of the bookcase can be covered with a remnant of whimsical wallpaper or fabric for a burst of unexpected pattern inside the nook that makes it feel like a secret world. Shelves within the nook can be angled with a small strip of timber to create forward-facing book displays that allow children to see the covers of their favourite books rather than only the spines.
The ceiling of the reading nook — the underside of the top shelf, or a piece of fabric draped across the gap between the two bookcases at the top — is an opportunity for pure whimsical magic. Attach star stickers and fairy lights to the ceiling fabric or shelf underside, create a small canopy of gauze or tulle above the seating area, or use blackboard paint on the ceiling panel so the child can draw their own stars and constellations overhead. Any of these gestures transforms a reading nook from functional to enchanted, and costs just a few dollars in materials.
Style tip: Attach a small brass hook to the inside of the reading nook curtain and a corresponding loop to the curtain fabric so that the child can tie the curtain open themselves — this small detail gives children a sense of ownership and control over their private space.
10. Dreamy Canopy From a Hula Hoop and Sheer Fabric: A 20-Minute Bed Transformation
Budget: Estimated cost: $5–$20
The hula hoop canopy is the internet’s best-kept secret in children’s bedroom decoration — a hack so simple, so inexpensive, and so visually effective that it genuinely seems like cheating. Take one standard plastic hula hoop from a toy shop or dollar store (typically two to three dollars), wrap it in ribbon, fairy lights, or floral wire to disguise the plastic, hang it horizontally from a single ceiling hook at the desired height above the bed using three or four lengths of ribbon or fishing line, gather and attach several panels of sheer fabric — tulle, voile, or organza — around its circumference so that the fabric falls in a full circle to the floor on all sides, and the bed is suddenly enclosed in a complete, floor-length fabric canopy that looks like something from a boutique children’s hotel.
The fabric choice for the hula hoop canopy determines the entire character of the installation. White tulle creates the most universally loved, classic princess-canopy look — pure, soft, and genuinely beautiful against any wall colour. Blush or dusty rose voile creates a more romantic, slightly grown-up quality that suits older children. Pale gold or champagne organza has a subtle shimmer that looks extraordinarily luxurious in warm light. For an enchanted forest interpretation, use white sheer fabric as the base and add strings of artificial ivy or eucalyptus threaded through the hula hoop where the fabric is gathered, so that the canopy appears to be growing from a botanical wreath overhead.
To elevate the hula hoop canopy to genuinely magical status, weave a string of warm white fairy lights around the hula hoop itself before attaching the fabric — the lights glow through the gathered fabric at the top of the canopy and illuminate the inside of the fabric enclosure with a warm, diffused glow that transforms bedtime into something children look forward to rather than resist. The total cost of lights, hula hoop, and fabric for this version of the canopy is typically under twenty dollars — and the result photographs so beautifully that it is one of the most saved DIY kids room ideas on Pinterest.
Style tip: Add dried or faux flowers to the hula hoop canopy by weaving small stems through the ribbon-wrapped hoop before attaching the fabric — blush dried roses, lavender, and baby’s breath create an extraordinarily beautiful, bohemian floral canopy that looks handmade in the most luxurious sense.
11. Whimsical Mushroom Corner: The Cottagecore Micro-Trend That Costs Under $25
Budget: Estimated cost: $15–$30
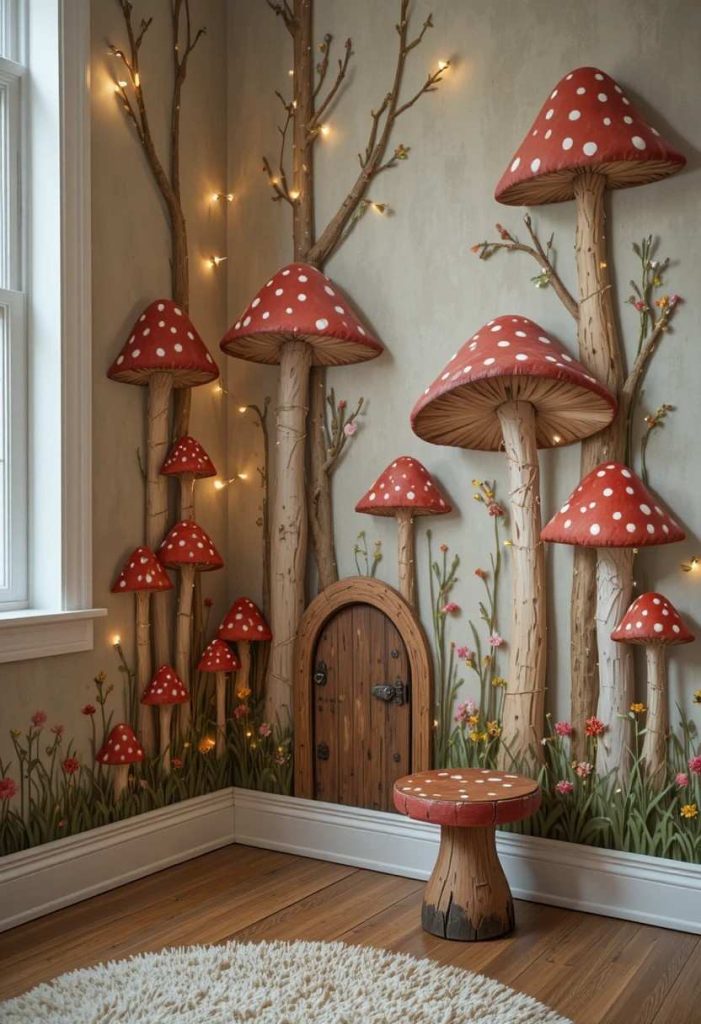
Mushroom-themed children’s bedroom decor is experiencing a genuinely remarkable surge in Pinterest interest — driven by the intersection of the cottagecore aesthetic, the fairycore movement, and the broader cultural embrace of nature-inspired whimsy in children’s spaces. From mushroom-shaped nightlights and mushroom-print bedding to mushroom wall stickers and even mushroom-shaped stools, the fungi-inspired whimsical bedroom has become one of the most-searched and most-saved micro-trends within the broader whimsical kids room category on Pinterest. And the beautiful thing about the mushroom theme is that it can be introduced into a room at virtually any budget level — from a five-dollar set of mushroom wall stickers to a more elaborate fairy forest mushroom corner installation.
The most budget-friendly and most visually impactful mushroom room feature is a painted or stencilled mushroom mural on a single wall corner — a forest floor scene featuring tall grass, painted mushrooms in classic red-and-white polka-dot toadstools alongside more naturalistic brown and cream varieties, a scattering of flowers, perhaps a tiny door in the baseboard suggesting a fairy home hidden at floor level. This can be painted entirely freehand using basic craft paints and a selection of round brushes, requires no artistic training beyond a willingness to embrace imperfection, and creates a feature that is genuinely unique and deeply beloved by children.
For those who prefer not to paint directly onto walls, high-quality mushroom and fairy forest wall stickers — available from numerous Etsy sellers and online home stores for under twenty dollars — create a virtually identical effect to a painted mural and can be repositioned or removed without wall damage. Combine wall stickers with a small mushroom-shaped stool (widely available from children’s furniture retailers at low cost), a mushroom nightlight, and a set of mushroom-print cushion covers on the bed for a complete, cohesive mushroom theme that reads as genuinely designed and intentional.
Style tip: Add a small fairy door to the baseboard of your mushroom corner — a tiny wooden door painted to look like it belongs to a fairy home is available for just a few dollars on Etsy and creates an absolutely irresistible detail that children return to again and again.
12. Paper Star and Moon Ceiling Garlands: Celestial Magic for Under $10
Budget: Estimated cost: $5–$15
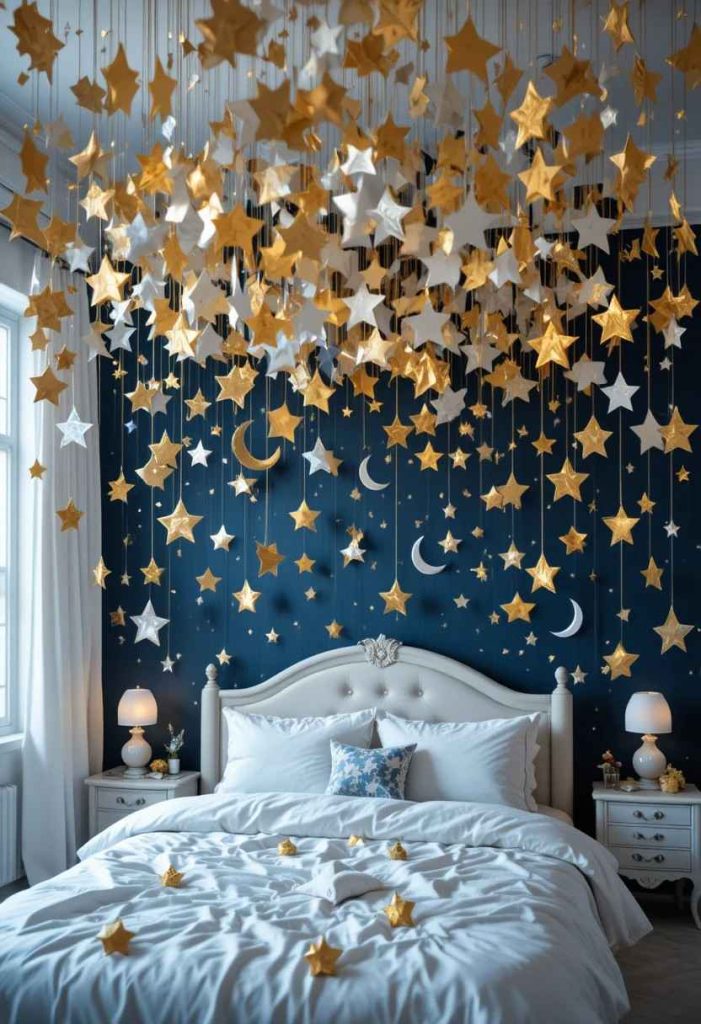
A ceiling filled with hanging paper stars and moons creates one of the most visually extraordinary whimsical bedroom atmospheres available at any budget level — the suspended forms catch air currents from opening and closing doors, turning gently in a perpetual slow drift that gives the room a quality of magical, perpetual movement that children find endlessly captivating. Paper stars and moons in varying sizes, hung at varying lengths from the ceiling, create a layered, three-dimensional installation that looks like something between a contemporary art installation and a fairytale sky, and costs under ten dollars in materials.
Three-dimensional paper stars — the classic origami-inspired forms known as lucky stars or Moravian stars — can be folded from a sheet of card in just a few minutes each, or purchased in multipacks for just a few dollars. Gold, silver, and white are the most effective colours for a ceiling installation — they catch light from all angles and create a warmly glowing, constellation-like effect that is particularly beautiful in the evening. Use invisible thread and a ceiling hook to hang the stars at three or four different lengths, clustering them above the bed in dense formations and allowing them to thin out toward the edges of the room for a perspective effect that makes the bed area feel like the centre of a starfield.
Combining paper stars with crescent moon shapes cut from gold metallic card creates a complete celestial narrative overhead. For the most professional finish, use a craft cutting machine (Cricut or Silhouette) to cut the stars and moons in consistent, precise shapes from metallic cardstock — the clean edges and perfect geometry of machine-cut forms makes an enormous difference to the finished quality of the installation. For those without a cutting machine, hand-cutting using a star-shaped cookie cutter as a template and a sharp craft knife produces very acceptable results at no additional equipment cost.
Style tip: Vary the sizes of your hanging stars dramatically — from tiny 3cm stars to large 15cm statement stars — and hang the largest ones lowest and the smallest ones highest to create an illusion of depth and distance that makes the ceiling installation feel genuinely three-dimensional.
13. Fairy Door Collection on the Baseboard: The Most Irresistible $15 Kids Room Feature
Budget: Estimated cost: $10–$25
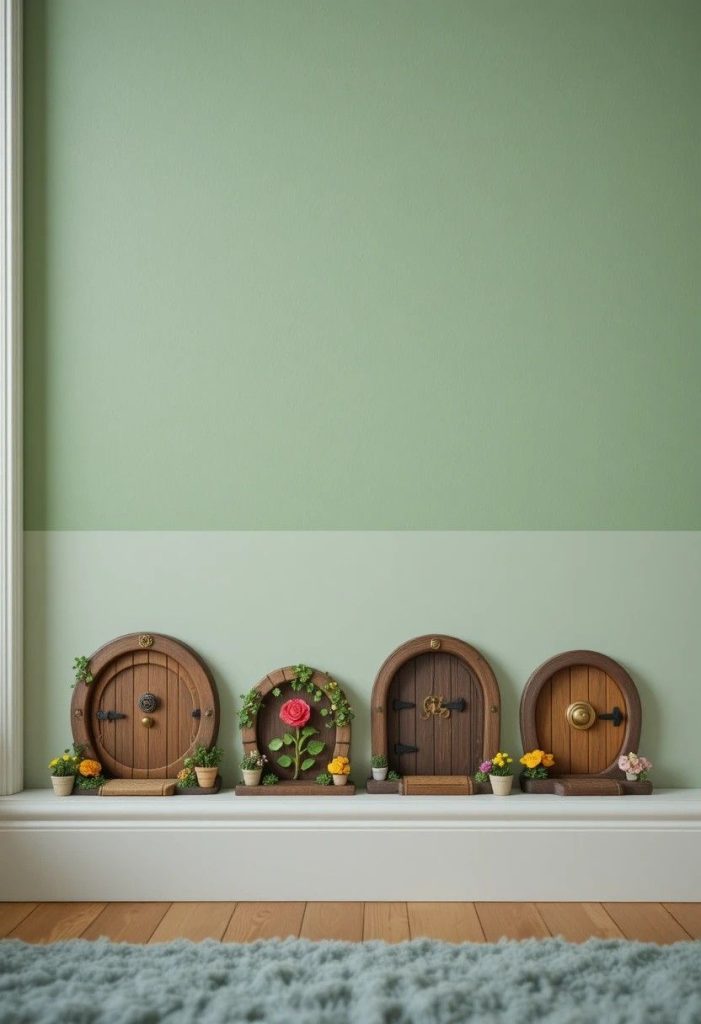
Fairy doors are small, decorative wooden doors fitted to the baseboard or skirting board of a child’s room as if leading to a miniature world hidden within the walls — and they are one of the most beloved, most discussed, and most long-lasting children’s room features available at any budget. The concept is simple: the door appears to be a genuine entry point to a fairy world, complete with tiny door knockers, miniature letter boxes, and small accessories left outside (a thimble-sized watering can, a tiny lantern, a miniature welcome mat) as if the fairy inhabitants have just stepped inside. Children engage with their fairy doors with an intensity and consistency that far exceeds more expensive toys and decorative features, returning to them daily to check for signs of fairy activity.
A collection of three to five fairy doors in different styles — a rustic wooden door with a tiny brass knocker, an arched green door with a climbing rose motif, a round hobbit-style door in warm brown — creates a small fairy village along the baseboard of one wall. Each door can be given a different character: one belongs to a family of mice, another to a flower fairy, a third to a small gnome. The children who live with these doors develop entire narratives and mythologies around their fairy inhabitants, leaving tiny notes and miniature gifts that receive responses (written by parents in tiny script). This ongoing, imaginative exchange between child and ‘fairy’ is one of the most developmentally enriching and emotionally meaningful things a whimsical room feature can facilitate.
Fairy doors are available from Etsy sellers and specialist children’s decor retailers for between three and eight dollars each, making a collection of five doors achievable for under forty dollars. Alternatively, they can be made from craft materials for under a dollar each. The accessories — tiny lanterns, miniature flower pots, small painted stones, tiny furniture — can be sourced from dollhouse supply shops, craft stores, or made at home from clay and natural materials. The fairy door setup grows and evolves over time as new accessories are added, making it a feature that maintains its interest and engagement value for years.
Style tip: Create a ‘fairy mailbox’ alongside one of the fairy doors — a small wooden box with a slot, painted to look like a tiny post box — so that children can leave letters for the fairies and receive replies. The parent’s nightly task of writing tiny fairy letters is one of the most magical rituals of childhood.
14. DIY Painted Mural: A Weekend Project That Creates a Lifelong Memory
Budget: Estimated cost: $10–$30 in craft paints
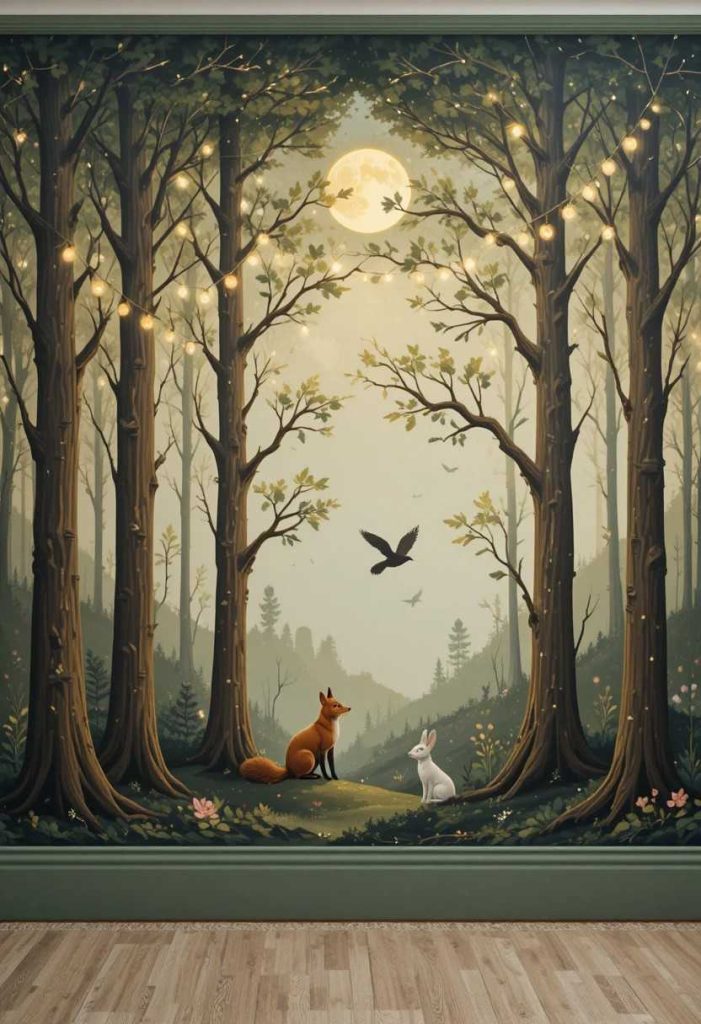
The hand-painted mural is the whimsical kids room feature that makes the most fundamental and permanent transformation possible — turning a flat, painted surface into a narrative world that becomes the defining character of the space. And while the phrase ‘painted mural’ might conjure images of professional artists and significant expense, the reality is that some of the most beloved and most visually effective children’s room murals have been painted by parents with no formal art training, using basic craft paints, simple reference images projected onto the wall with a phone torch, and the willingness to embrace the charming imperfection that gives DIY murals their particular emotional warmth.
The most achievable and most popular whimsical mural subjects for non-artist parents include: a simple hot air balloon scene with clouds on a soft blue sky above the bed; a woodland scene with painted tree trunks rising from the skirting board to the ceiling with branches spreading across the upper wall; a large-scale underwater scene with fish, coral, and sea plants in bright watercolour-style washes; a mountain landscape at sunrise with layered colour bands creating the sky; and a simple night sky with a large painted moon and hand-drawn star formations. Any of these can be achieved with reference to basic step-by-step tutorials available for free on YouTube and Pinterest, and require nothing more than a set of craft paints, a selection of brushes, and a couple of weekend afternoons.
The technique that makes DIY murals accessible regardless of artistic confidence is the projector method: display a chosen image on a phone or tablet, use a torch to project or trace the shapes onto the wall in pencil, then fill in with paint. This approach allows any parent to create clean, recognisable shapes and proportions without freehand drawing skills. Once the shapes are painted in their base colours, details — texture, shadow, highlights, small decorative elements — can be added freely and loosely, with the understanding that imperfect, painterly detail reads as genuinely artisanal rather than amateur.
Style tip: Involve your child in painting their own mural from the earliest stages — even very young children can contribute painted clouds, grass, or simple dot flowers, and the resulting imperfect, collaborative artwork becomes a profoundly meaningful record of the childhood the room was designed to celebrate.
15. Whimsical Vintage Finds From Thrift Stores: Curating Magic From Other People’s Cast-Offs
Budget: Estimated cost: $10–$40 for a full accessory collection
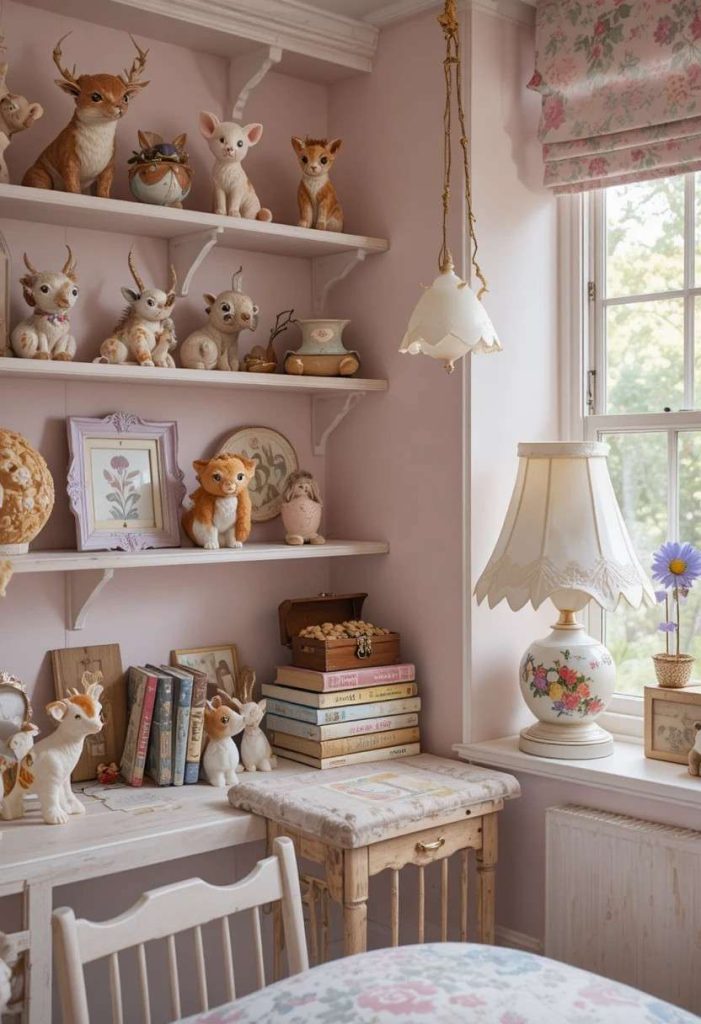
The most characterful and most visually interesting whimsical kids rooms are never entirely purchased from a single shop — they are assembled over time from a variety of sources, with the most unique and memorable pieces often coming from thrift stores, charity shops, estate sales, and car boot markets where the cast-off treasures of previous generations wait to be discovered by parents with an eye for whimsical potential. A 1950s ceramic lamp with a hand-painted floral design for three dollars. A set of vintage illustrated children’s books for fifty cents each. A small wooden treasure chest with a working clasp for five dollars. An antique hand mirror with a moulded floral frame for two dollars. These objects, assembled together in a child’s room, create a richness and individuality that no amount of new-shop purchasing can replicate.
The curatorial skill required for thrift-store whimsical styling is not complex — it requires only the ability to see beyond an object’s current state to its potential, and the consistent application of a colour palette that ties individually sourced pieces together into a cohesive whole. If your room’s palette is soft pastels — blush, lavender, mint, cream — then any thrift-store find in these tones is a candidate for the room, regardless of its original context. A cream-painted wooden jewellery box, a blush glass vase, a lavender fabric-bound journal — all individually sourced, all cohesive in the room because of their shared colour family.
Specific thrift-store categories that consistently yield excellent whimsical kids room finds include: vintage ceramic animal figurines (rabbits, foxes, hedgehogs, owls) that can be displayed as a collection on open shelving; old picture frames in interesting moulded shapes that can be painted and used to display favourite illustrations or the child’s own artwork; vintage fabric remnants in interesting prints that can be used as cushion covers or wall hangings; old wooden boxes and crates that serve beautifully as toy storage; and vintage children’s plates and cups with illustrated designs that make charming display pieces.
Style tip: Develop a consistent ‘thrift store brief’ for your whimsical room — a written note of the specific colours, materials, and object types you are looking for — and take it with you on every thrift store visit. Having a clear brief prevents impulse purchases that do not fit the room and helps you instantly recognise relevant pieces among the noise.
16. Cloud-Shaped Shelves From Plywood: Designer-Looking Storage for $15
Budget: Estimated cost: $10–$25 including materials and paint
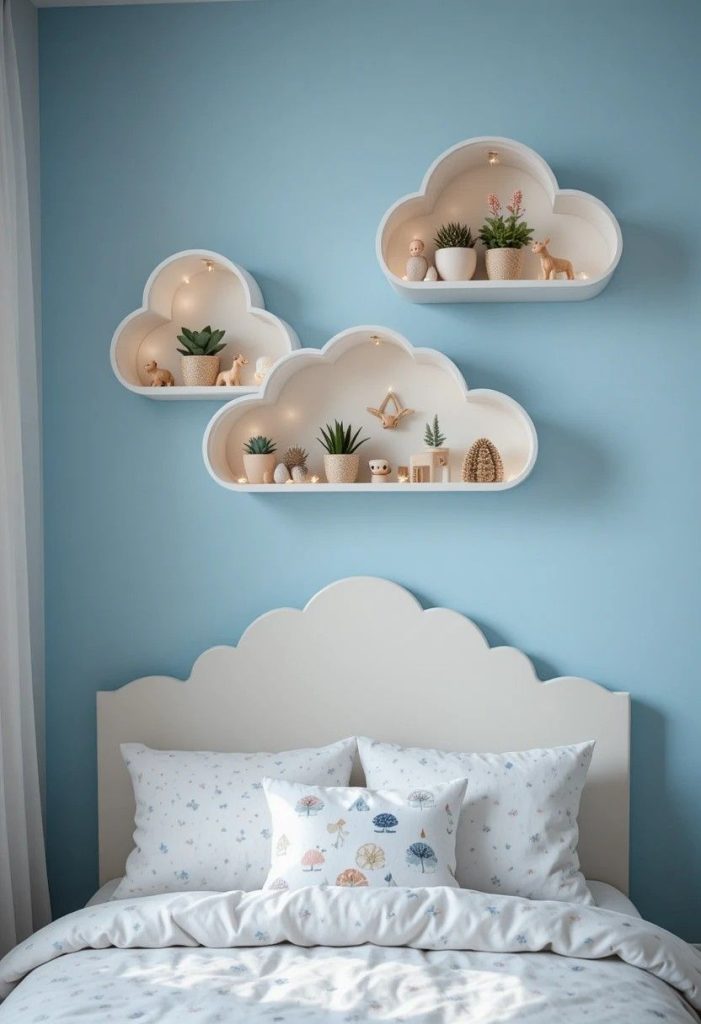
Cloud-shaped floating shelves are consistently among the most-saved and most-recreated DIY ideas within the whimsical kids room category on Pinterest — and for very good reason. They are visually charming, practically useful as display and storage surfaces, and simple enough to make from a single piece of plywood with a jigsaw and a tin of white paint that the project is genuinely achievable for anyone with a basic level of DIY confidence. The result — smooth white cloud forms floating on the wall above a bed, holding small toys, books, and plants — looks like something from a bespoke children’s interior project and costs a fraction of what equivalent retail versions sell for.
The basic cloud shelf is a length of plywood (12mm is ideal for adequate strength without excessive weight) cut in the classic cartoon cloud outline — a horizontal oval base with three rounded bumps across the top surface — using a jigsaw. The curved edges are sanded smooth with progressively finer sandpaper until perfectly rounded, then the entire piece is primed and painted in a soft white or very pale blue. Two keyhole bracket fittings recessed into the back of the shelf make the fixing invisible and allow the shelf to sit flush against the wall. Installed in a small cluster of three cloud shapes at varying heights above the bed, the effect is immediate and genuinely magical.
For those without jigsaw access, cloud-shaped shelves are available from Etsy makers, specialist children’s furniture suppliers, and Amazon in a range of sizes for between fifteen and thirty dollars each — still very affordable and still significantly less expensive than equivalent retail shelf sets. For maximum impact, install three shelves in different sizes — a large cloud on one side at mid height, a medium cloud at a slightly different height, and a small cloud on the other side — creating a natural, asymmetric cloud formation across the wall. Paint the shelves in the same white as the ceiling for the most seamless, integrated look, or in soft pastel blue for a sky reference that reinforces the cloud theme.
Style tip: Place a small cotton wool puff or a tiny battery-operated cloud-shaped light on top of each cloud shelf for a charming meta-detail — a real cloud sitting on a cloud shelf — that delights both children and adults and photographs beautifully.
17. Enchanted Garden Corner With Artificial Flowers and Plants: Botanical Magic Under $20
Budget: Estimated cost: $15–$30
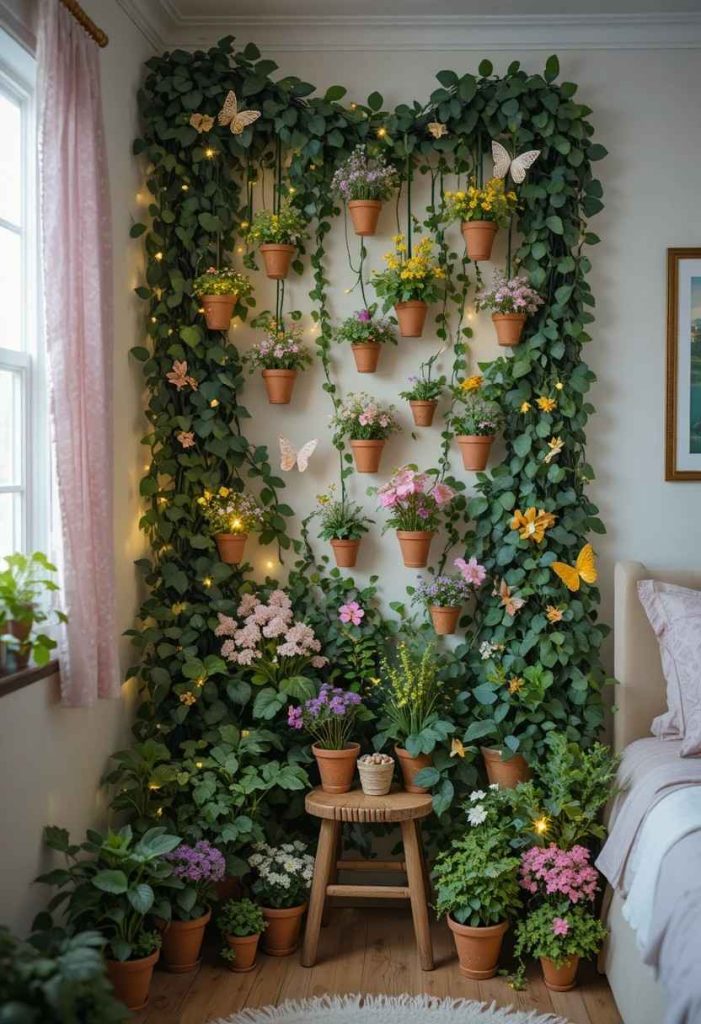
An enchanted garden corner transforms the most neglected area of a child’s room — the corner where a lamp sits and nothing interesting happens — into a botanical fantasy landscape that costs under thirty dollars and takes under an hour to assemble. The concept involves clustering a collection of artificial plants, flowers, and botanical elements in and around a corner of the room: trailing artificial ivy along the wall from a ceiling hook, potted faux flowers in terracotta pots on the floor and on a small stool, butterfly and dragonfly decorations pinned to the wall among the artificial foliage, and fairy lights woven through the plant stems for a softly glowing, garden-by-moonlight atmosphere.
Artificial plants have improved enormously in quality and realism over the past several years, and the best contemporary versions — available from home stores and online retailers at very accessible price points — are genuinely difficult to distinguish from real plants at a casual glance. For a whimsical garden corner, choose plants with interesting shapes and colours rather than simply the most realistic ones: oversized tropical leaves in deep green, trailing vines with small heart-shaped leaves, cascading wisteria-style flowers in soft purple, large-headed blooms in blush pink. The goal is a garden that looks like it belongs in a fairy story rather than a botanical garden.
The fairy light element is crucial to the enchanted garden corner’s success — without lighting, artificial plants read as craft-shop props; with warm fairy lights woven through them and glowing between the leaves, they read as a genuinely magical garden environment. Use a string of warm white micro-lights — the smallest available bulb size for the most realistic, firefly-like effect — and weave them loosely through the plant collection at varying depths, not just on the surface. The resulting glow from within the artificial foliage creates an effect that photographs extraordinarily well and that children find completely compelling.
Style tip: Add one or two real low-maintenance plants to the enchanted garden corner alongside the artificial ones — a small pothos, a haworthia succulent, or a peace lily — for the genuine quality of living green and the educational value of caring for real plants.
18. DIY Teepee or Fort as a Permanent Whimsical Feature: The Ultimate Imagination Zone
Budget: Estimated cost: $20–$50
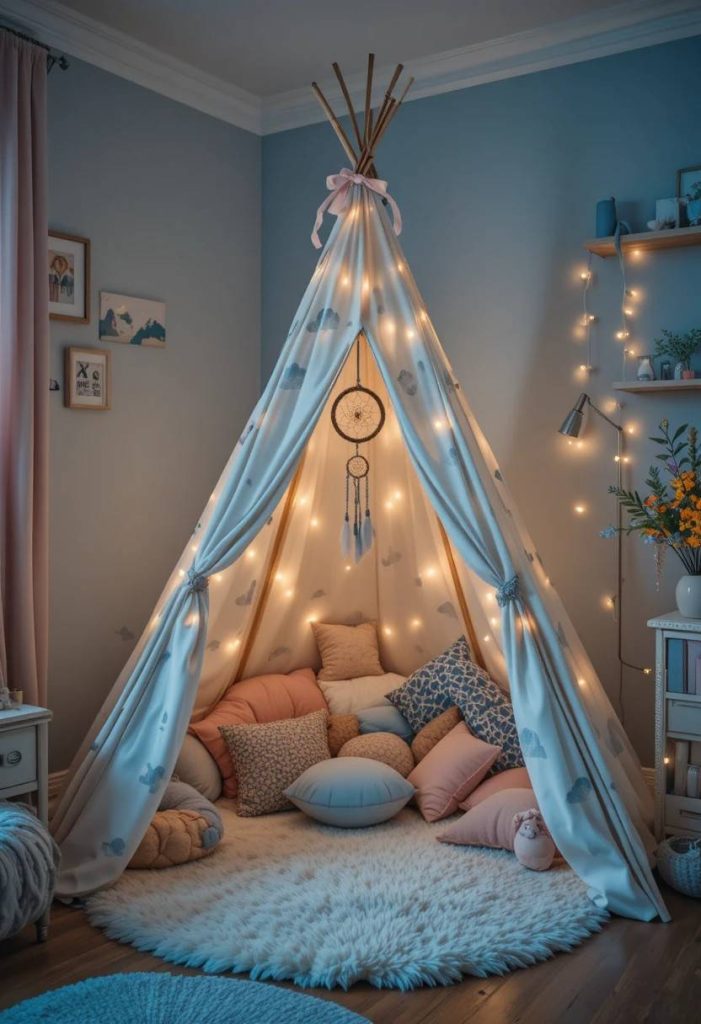
A teepee or fabric fort is one of the most consistently beloved features in any child’s room — the enclosed, tent-like space creates an immediate, instinctive sense of safety and ownership that every child responds to, and the whimsical interpretation of this primal love of enclosed spaces takes the simple tent structure and fills it with all the magic that fairy lights, cushions, bunting, and soft light can provide. A basic DIY teepee can be made from five bamboo canes, some rope, and a length of canvas or cotton fabric for under twenty dollars, and the resulting structure provides years of imaginative play as a fairy house, a reading den, a dragon’s lair, or whatever the child’s current obsession demands.
The simplest teepee construction requires five bamboo garden canes approximately 1.8 metres in length, tied together at the top with a length of rope or leather cord, then spread into a conical base approximately one metre in diameter. The fabric is cut to form four triangular panels that wrap around the structure with a front opening, and can be attached with safety pins, fabric ties, or simple stitching if you have basic sewing skills. Paint or tie-dye the fabric panels in whimsical colours and patterns before assembly — watercolour-style painted clouds and moons, a simple galaxy pattern in dark blue and gold, or a soft ombre from white to blush — for a finished teepee that looks genuinely designed.
The interior of the whimsical teepee is where the true magic lives. Line the floor with a small rug or a pile of cushions in coordinating fabrics. Attach a string of fairy lights to the canes inside so that the interior glows warmly at night. Hang a small dreamcatcher or a cluster of paper stars from the central peak. Place a small wooden tray with a few treasured objects — a favourite book, a small plant, a soft toy — to make the interior feel like a genuinely furnished private world. The teepee interior, once established, will be rearranged, redecorated, and personalised by the child over time in ways that make it uniquely their own.
Style tip: Make the teepee entrance special — hang beaded curtains, a length of fabric bunting, or a small handmade sign with the child’s chosen name for their space (‘Lily’s Fairy House’, ‘The Dragon’s Den’) above the entrance to establish its identity and sense of permanence.
19. Whimsical Gallery Wall of Children’s Book Illustrations: Art That Costs Almost Nothing
Budget: Estimated cost: $5–$20 for frames
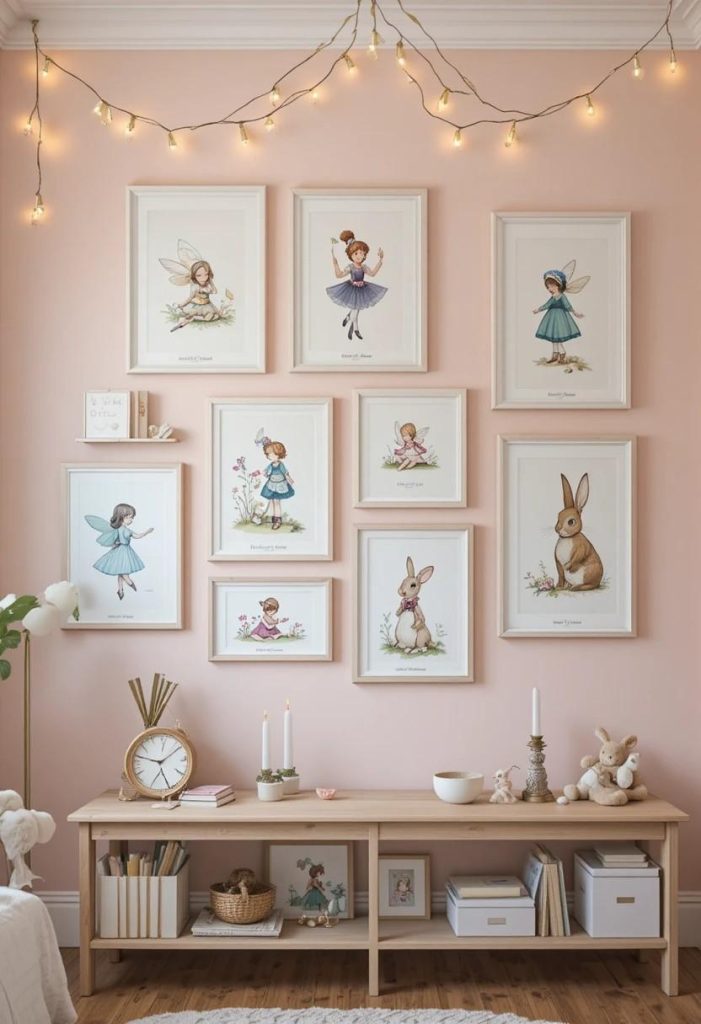
A gallery wall is one of the most powerful and versatile decorating tools available for any room in the home — and in a child’s whimsical bedroom, a gallery wall composed of illustrations sourced from beloved children’s books creates a display of genuinely extraordinary beauty and personal meaning at almost zero cost beyond the price of frames. The illustrations from the golden age of children’s book publishing — the work of Beatrix Potter, Ernest Shepard, John Tenniel, Arthur Rackham, Kay Nielsen, Edmund Dulac, and dozens of lesser-known but equally beautiful illustrators — are among the finest works in the entire history of illustration, and their reproduction in a framed gallery context transforms them from book pages into genuine artworks.
The source material for a children’s book illustration gallery wall is free or nearly free. Pages from damaged or incomplete vintage books are available at charity shops and second-hand bookshops for cents per page. Free public domain illustrations from pre-1926 publications can be downloaded from the Project Gutenberg digital library and printed at home or at a library for minimal cost. Greeting cards, wrapping paper, and gift bags frequently feature high-quality illustration work that frames beautifully. The key is choosing illustrations that share a consistent aesthetic — the delicate watercolour work of the Edwardian illustrators creates a cohesive, beautifully soft gallery; bold, graphic mid-century picture book illustrations create a different but equally strong visual impact.
Second-hand frames from thrift stores, dollar stores, and online marketplace listings provide the hanging infrastructure at minimal cost. Mismatched frames in different sizes and profiles can be unified with a coat of the same chalk paint colour — all white, all soft gold, or all the same pastel tone — for a gallery wall that looks professionally curated despite being composed of individually sourced elements. Arrange frames on the floor before committing to wall positions, using the floor arrangement to experiment with spacing, sizing balance, and composition until you achieve a layout that feels both dynamic and harmonious.
Style tip: Include one or two pieces of the child’s own artwork in the gallery wall alongside the illustration prints — framed in the same style as the purchased artwork — to communicate to the child that their creative work is valued as highly as anything purchased or professionally made.
20. The Complete Whimsical Room Transformation for Under $100: Putting It All Together
Budget: Estimated total: $80–$120 for a full room transformation

All twenty of the budget whimsical room ideas in this article are valuable individually — but their true transformative power is revealed when several are combined into a coherent, layered room design that addresses the ceiling, walls, bed, storage, and accessories simultaneously. A complete whimsical room transformation using exclusively budget-friendly approaches — one that looks, from the outside, like the result of a significant financial investment in a child’s dream bedroom — is entirely achievable for between eighty and one hundred and twenty dollars, depending on what is already available in the home. Here is how to allocate that budget for maximum visual impact.
The ceiling gets the cloud treatment ($10–15) and fairy lights for the canopy ($8–12). One feature wall gets a peel-and-stick wallpaper panel in a whimsical forest or floral print ($30–40). The bed gets a hula hoop canopy with sheer fabric ($5–15) and a set of cushion covers in coordinating whimsical prints ($10–15 from discount stores or Etsy). The shelving gets cloud-shaped shelves made from plywood ($10–15) or sourced inexpensively. The floor gets a jute or cotton rug in a complementary colour ($15–25 from discount stores). And the accessories — star ceiling stickers, fairy doors, botanical corner with artificial plants, a thrift-store gallery wall of framed illustrations — fill in the remaining details for the remaining twenty to thirty dollars.
The critical principle that holds this complete transformation together is colour palette consistency. Choose three key colours before buying anything — for example, soft white, pale lavender, and forest green — and ensure that every element, from the wallpaper to the rug to the cushion covers to the fairy door paint, sits within this palette. Colour consistency is what transforms a collection of individually sourced, budget items into a room that reads as coherently and deliberately designed. It costs nothing to apply and makes the difference between a room that looks curated and a room that simply looks busy. With this principle applied, a complete whimsical room transformation for under one hundred dollars is not merely achievable — it is extraordinary.
Style tip: Photograph the room once the transformation is complete and share on Pinterest with your budget breakdown in the pin description — budget transformation content consistently performs among the highest-saved categories on the platform, and your room could inspire thousands of other parents.
Frequently Asked Questions About Budget Whimsical Kids Room Design
What is the single highest-impact whimsical room change I can make for under $20?
The fairy light canopy over the bed — a gathered length of sheer tulle fabric hung from a single ceiling hook with warm white fairy lights woven through it — costs under twenty dollars, takes under twenty minutes to install, and creates an immediate, dramatic transformation that looks extraordinarily expensive. It is the starting point we recommend for every budget whimsical room project.
Are these ideas suitable for rented accommodation where I cannot paint or make wall holes?
Almost all of the ideas in this guide are renter-friendly. Peel-and-stick wallpaper leaves no wall damage. Adhesive ceiling hooks and removable adhesive strips support fairy light canopies and hanging installations without drilling. Fairy doors attach with adhesive putty. Cloud ceiling installations use removable adhesive. The only ideas that require landlord permission are direct wall painting (murals and rainbow walls) and permanent shelf fixings — both of which can be replaced with removable alternatives (wall stickers for murals, freestanding shelving for storage).
How do I make a whimsical room that will grow with my child and not need redecorating in two years?
Invest in a neutral, naturally textured base — white walls, natural wood furniture, plain linen or cotton bedding — and layer the whimsical elements on top as removable, changeable decoration. Peel-and-stick wallpaper, fabric canopies, sticker constellations, and hanging installations can all be changed or removed as the child’s interests evolve, without touching the underlying room. The base never dates; the decoration updates easily and cheaply.
What is the most child-involving budget whimsical project in this guide?
The DIY painted mural is the most richly child-involving project, as children of almost any age can contribute painted elements and the resulting collaborative artwork has the greatest personal meaning. The fairy door collection is the most ongoing and imaginatively engaging — the parent-fairy correspondence it generates maintains children’s engagement for years rather than hours. The cloud shelf project is the most achievable as a joint parent-child making activity, as children can sand, paint, and decorate the shelves themselves.
Can I really create a complete whimsical kids room transformation for under $100?
Yes — genuinely. The complete room transformation described in Idea 20 is entirely achievable within a $100–120 budget by sourcing materials from discount stores, making ceiling and shelf features yourself from inexpensive materials, using peel-and-stick wallpaper for one feature wall, and thrifting accessories. The result is a room that will look, to every visitor, like the product of a very different level of investment. The principles of colour palette consistency, fairy light use, and attention to the ceiling and canopy do the majority of the visual work at a fraction of the cost.
The Complete Budget Whimsical Room Shopping List
Everything you need for a complete budget whimsical room transformation, with approximate costs and sourcing suggestions:
For the bed canopy
- 1 plastic hula hoop ($2–3 from toy shop or dollar store)
- 2–3m sheer fabric: tulle, voile, or organza ($3–8 from fabric shop)
- 1 ceiling hook, rated for 2kg+ ($1–2 from hardware store)
- 1–2 strings warm white fairy lights, battery operated ($6–10)
For the ceiling
- 1 bag polyester fiberfill for cloud effect ($3–5 from craft shop)
- White ceiling paint, small tin ($5–8)
- Glow-in-the-dark star stickers, pack of 200+ ($5–8)
- Optional: sky blue ceiling paint for cloud background ($8–12)
For the walls
- Peel-and-stick whimsical wallpaper, 1 feature wall ($25–40 from online retailers)
- Craft paints for mural or rainbow wall, 6 colours ($8–12)
- Painter’s tape for clean lines ($3–5)
- Fairy door set of 3–5 ($10–25 from Etsy or craft stores)
For shelving and storage
- 1 sheet 12mm plywood for cloud shelves ($8–12 from timber merchant)
- White paint, small tin ($4–6)
- Keyhole brackets x4 ($4–6)
- Real or faux branch for tree bookshelf (free–$5)
For accessories
- Artificial plants and flowers, small collection ($8–15)
- Paper stars and moons in gold/silver, multipacks ($5–8)
- Thrifted accessories: ceramic animals, frames, small objects ($5–20)
- Mushroom nightlight ($5–10 from online retailers)
Conclusion: Magic Is Not a Matter of Money
A child who grows up sleeping under a glowing star ceiling, whose bed is enclosed in a softly lit fairy light canopy, who has a tiny mushroom corner with a fairy door at its base and a tree branch bookshelf above their favourite books — that child is not experiencing a budget version of a magical childhood. They are experiencing the real thing.
The whimsical kids room is not fundamentally about money. It is about intention, creativity, and the willingness to invest time, care, and imagination in creating a space where a child’s inner life — their dreams, their stories, their sense of wonder at the world — is met with an environment that reflects and nourishes it. This guide exists to demonstrate that this kind of environment is accessible to every family, regardless of budget.
Take these twenty ideas, choose the ones that resonate most deeply, apply the colour palette principle, and begin. The results will surprise you — and they will not surprise your child, who will take every bit of the magic entirely for granted and love it completely.
Create magic. Keep the budget. Give them the childhood they deserve.